Create Facebook Ads yourself! Only 3 steps – Pixel, Business Manager, Audience, Ads
Do Facebook Ads yourself – How to run Facebook Ads / Instagram Ads? How much does advertising cost in Facebook? The A&O is the Facebook Pixel. This pixel collects data about target groups, visitors and fans. From this data, we can target ads on Facebook. The Facebook Pixel helps you to use your social ad budget optimally. Here we have summarized everything you need to know about the Facebook Pixel. Conversion Campaigns’, ‘Custom Audiences’ from your shop, ‘Dynamic Ads’? You can only do all that if you use the Facebook Pixel. Also, you need the pixel to see certain metrics, like ‘Cost Per Lead’ or ‘Cost Per Conversion’. Tip. Learn more about our Facebook agency.
Our goal: Facebook marketing through ads
In Berlin, Cologne, Düsseldorf, Munich and Hamburg and all over Germany, social ads (mostly via Facebook [there also Instagram / Whatsapp]) are among the marketing tools for building reach, with A-priority. You shouldn’t run ads without Facebook Pixel. You can refine, control and improve ads.
Here’s a quick summary of what you’ll learn in these articles:
- Create and install pixels
- Create Custom Audience
- Optimize ads
Before we get deep into ads on Facebook, here’s a simple example of a single, small campaign in PowerEditor.
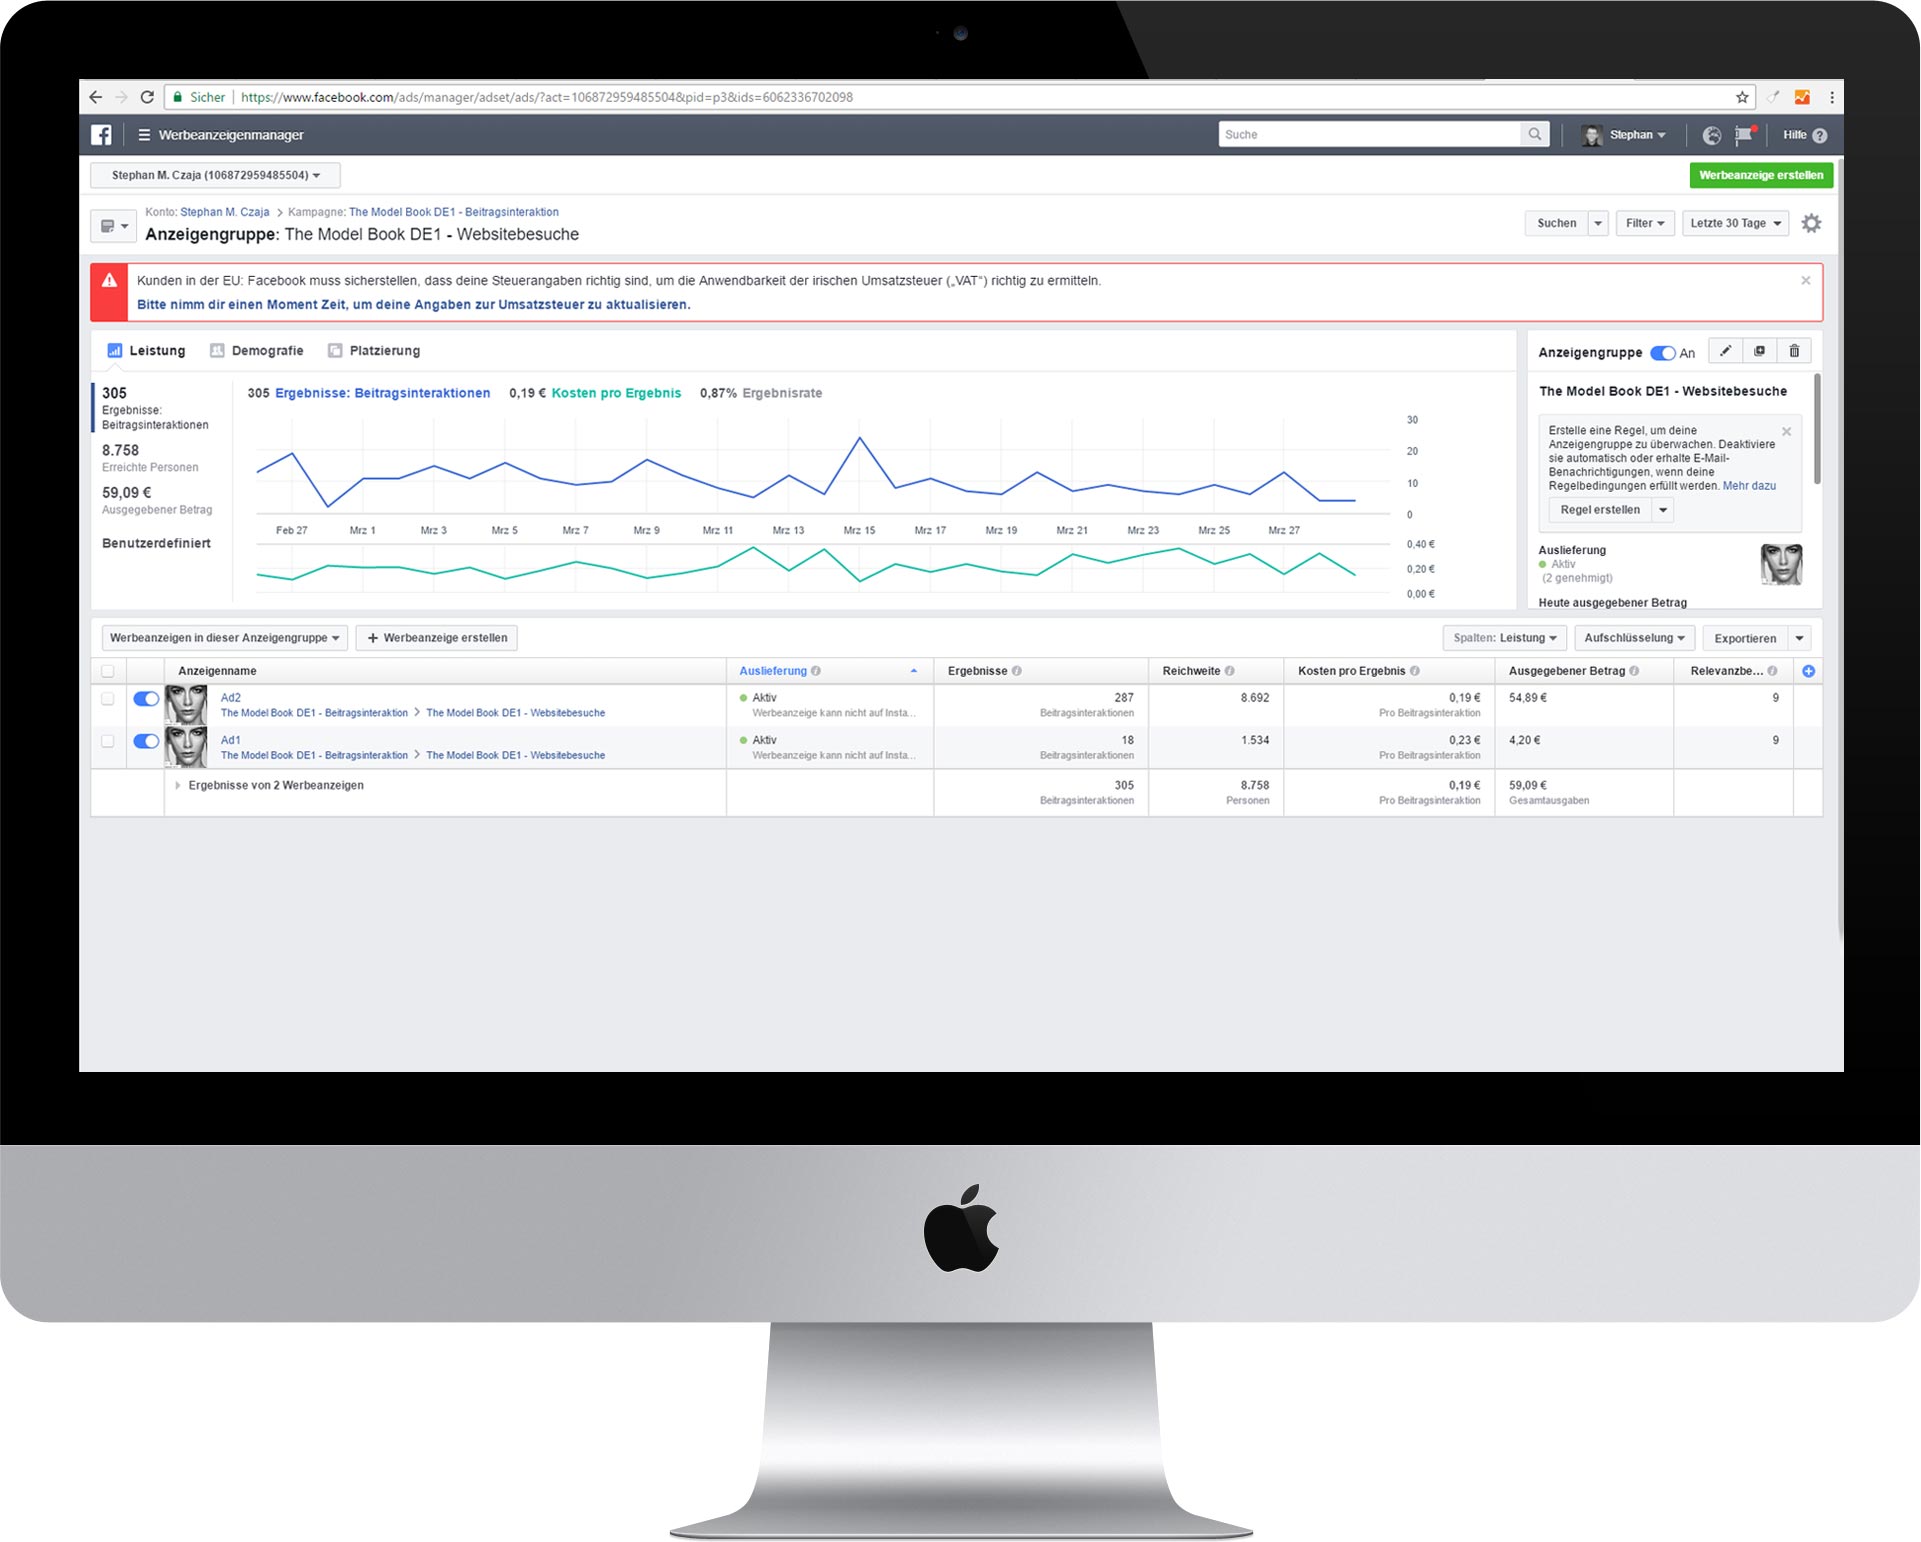
Best Practice: Simple Facebook Campaign
Here is a small example of a simple Facebook Ads without complex extras. Reached 8,758 people, with 109 sales and a spent budget of 59.09 euros. Achieved were 490.27 euros profit. here in the example 2 campaigns were tested against each other.
Key figures:
- 59,09 Euro Cost
- 8,758 people reached
- 109 contracts at 19.90 euros (gross) / 18.59 euros (net); margin 5.04 euros (net)
- 549,36 Euro Profit
- 490,27 Euro net profit (excl. expenses for Facebook Ad)
We’I’ll look at everything step by step and you’ll learn how to create campaigns. After you understand all the basics about Facebook Pixel and ads, we’I’ll also show you how campaigns are structured. So that your Facebook ads are good and cheap.
Here is a small example! At the end of the article you will understand exactly how such a campaign works.
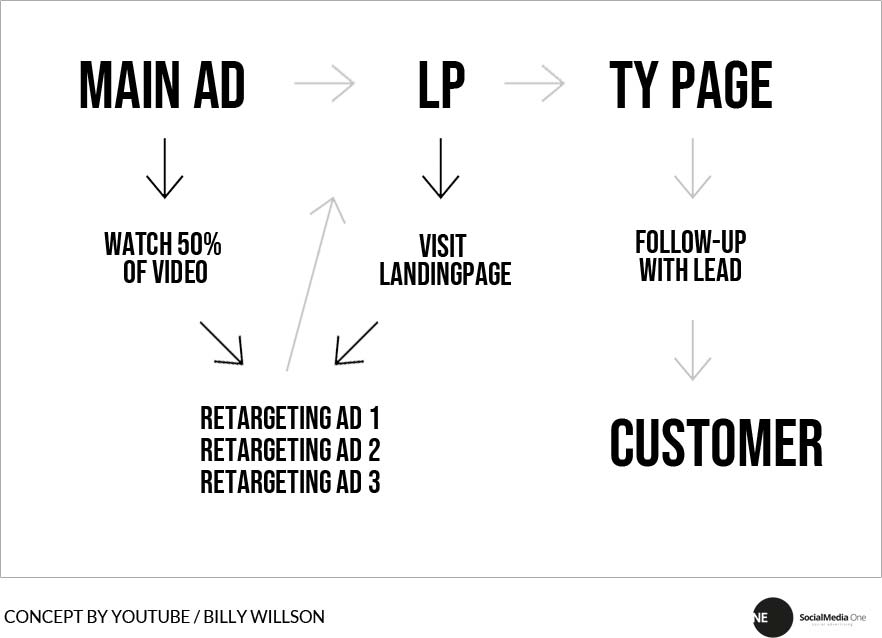
Infographic: Facebook Strategy 2020 – Example Customer Journey

What is the Facebook Pixel? Definition and possibilities
The Facebook Pixel is a small code that you insert into your website or online shop. The pixel collects data from your visitors and allows you to track and evaluate certain goals, such as the sale of a product or the subscription to the newsletter.
The pixel helps you to optimize your Facebook ads, you can create your own target groups for your ads (Target Audience) and target visitors who have visited your website or online shop (Remarketing). This way, visitors who have already interacted with your offer can continue to be served ads. This works by placing the code snippet and using cookies to automatically recognize users.
- Code snippet to insert into website and online shop
- Conversion tracking – capture, evaluate and use targets
- Optimize your ads
- Create target groups (Target Audience)
- Remarketing – Displaying suitable ads to website and online shop visitors
Basically there are two types of pixel, Facebook’s ‘Conversion Pixel’ and the ‘Custom Audience Pixel’. More about that later!
At the end of the article you can:
- Create Pixel
- Install Pixel
- Create event
- Track and analyze conversions (screenshot)

What can the pixel do?
The pixel provides you with a lot of important information to create better ads and it allows you to target ads even better to people.
This will improve your conversion rate (e.g. sales or newsletter opt-ins) and give you a more effective ROI.
When do I install the Pixel?
Even if you don’t run Facebook Ads yet, you should integrate the pixel directly, so you collect relevant data as quickly as possible. This way you can use the first data directly when you start your first Facebook campaign.
- Integration of the Facebook Pixel immediately (collect data)
- Data basis (target group) available at the start of the project
Conversion tracking
Your Facebook Pixel allows you to document the interaction of your visitors after they have seen your Facebook ad. But you can’t just track users on one device, the pixel works across devices, regardless of the user’s device. For example, you can see users who viewed your ad on their smartphone but later made the purchase at home on their desktop PC. This allows you to further optimize and improve your ads.
Your ROI also benefits from optimization.
- Conversion tracking tracks user interaction after viewing your Facebook Ad
- Ways and behaviors help optimize ads
Retargeting
Your goal: Turn “warm audiences” into customers as cheaply as possible. The so-called “warm audience” are people who have visited your website. The data can also come from your email or customer list or include people who have interacted with your Facebook page (e.g. watched a video):
- Website visitors
- E-mail or customer list
- Anyone who interacts with your Facebook Page
With retargeting, you reach users who have already visited your website or online shop. Through Facebook ‘Retargeting Pixel Data and Dynamic Ads’ you can create very individual ads. For example, you can show users exactly the product they have looked at in your shop. You can also explicitly show products from your own “Wish List” or from the “Bookmark” list.
- Display ads specifically to visitors of your own online offer (website, online shop, etc.)
- Individual offers for single pages, landing pages and products
Create Lookalike Audience
In Facebook Ads Manager, you can use the data to build a ‘Lookalike Audience’. It contains Facebook users with similar interests, likes and demographics to your website’s target audience. This way you can expand your potential reach to relevant people.
- Find people with similar interests and demographic characteristics
- Increase the potential reach among relevant people
Optimization after conversion
You can use the data collected from your tracking pixel to further optimize your ads through certain ‘events’.
Without the tracking pixel, you can only optimize based on clicks. With the pixel (and the data generated from it) you can track your goals even more precisely. For example, a specific event could be a product sale or even the registration in the newsletter.
- Tracking pixel for further data in user behaviour
- Definition of events (individual actions)
Optimization by value
Facebook collects a lot of relevant data. The information about who buys and especially at what sales, helps you to further optimize your ads. Facebook will automatically improve and target the ads to people who match the price and sales level.
Use Facebook Pixel: Here’s how
With Facebook’s pixel you can track two types of events. The listing is from Hootsuite. Here you can find our software tip: Hootsuite for the pre-planning of postings.
- 17 predefined standard events
- Individually definable events
Standard Events
- Purchase: Someone makes a purchase on your website or in the online shop
- Lead: Someone signs up for your website (newsletter, survey, free PDF, etc.) or otherwise identifies themselves as a lead for you
- Registration (complete): Someone fills out a registration form on your website or registers as a user.
- Added payment information: Someone enters their payment information in the checkout process on your website
- Added to shopping cart: Someone adds a product to their shopping cart
- Added to wish list: Someone adds a product to a wish list
- Checkout: Someone starts thecheckout process to buy something from the online store.
- Search: Someone uses the search function to look for something
- Show content: Someone lands on a specific page of your website
- Contact: Someone contacts your company
- Customize product: Someone selects a specific version of the product, e.g. a specific color
- Donate: Someone donates to your cause
- Find Location: Someone is looking for the physical location of your company
- Schedule: Someone makes an appointment with you or a sales representative
- Trial: Someone signs up for a free trial of your product.
- Application: Someone applies to use a product, service or one of your programs.
- Subscribe: Someone subscribes to a paid product or service
Individualize events
If you still want to pursue specific, individual goals, you can do that through a bit of extra code, called parameters. These parameters allow you to refine the default events, based on:
- How much revenue does a particular conversion event generate?
- Currencies
- Content types or ID
- Shopping cart elements
Dog, cat or mouse? Example:
For example, you can track the visitors of a certain category instead of all visitors. Further down the line, you can separate dog fans from cat fans, for example, depending on which category they were looking at.
To use such custom events, you work with the URL for the ‘Custom Events’, it is based on specific URLs or URL keywords.
You can find out more about ‘Custom Conversions’ on the Facebook Help page.
Create and embed Facebook Pixel
Now that you understand how to work with the Facebook Pixel in tracking, it’s time to create your own Pixel and embed it into your website or online store.
Step 1: Create Pixel
To create a Facebook Pixel, you need to go to your Facebook Ads Manager. There you will find your menu in the top left corner.

Step 2: Select pixel
You now have 3 basic pixels to choose from.
- Online Events – “Add the Facebook Pixel to your website to enable conversion tracking, improve audience targeting, and maximize your return on advertising spend.”
- Offline Events – “Miss how your Facebook ads impact your actual results like in-store purchases, bookings, sales leads, etc.”
- App Events – “Set up, miss and manage actions people can take in your app. Learn more about your app users and see how your apps contribute to conversions.”


![]()
Step 3: Connect website with pixel
Choose a name for your pixel and enter the URL of your website or online shop.
Note on the name: Each ad account has only one pixel. So the name should represent the project rather than a specific campaign.
If you need more than one pixel, use Facebook Business Manager. You can find out more here at Facebook: Business Manager.
![]()
Step 4: Embed pixels
In the next step you will find two options:
- Automatic code setup by Facebook
- Manual setup
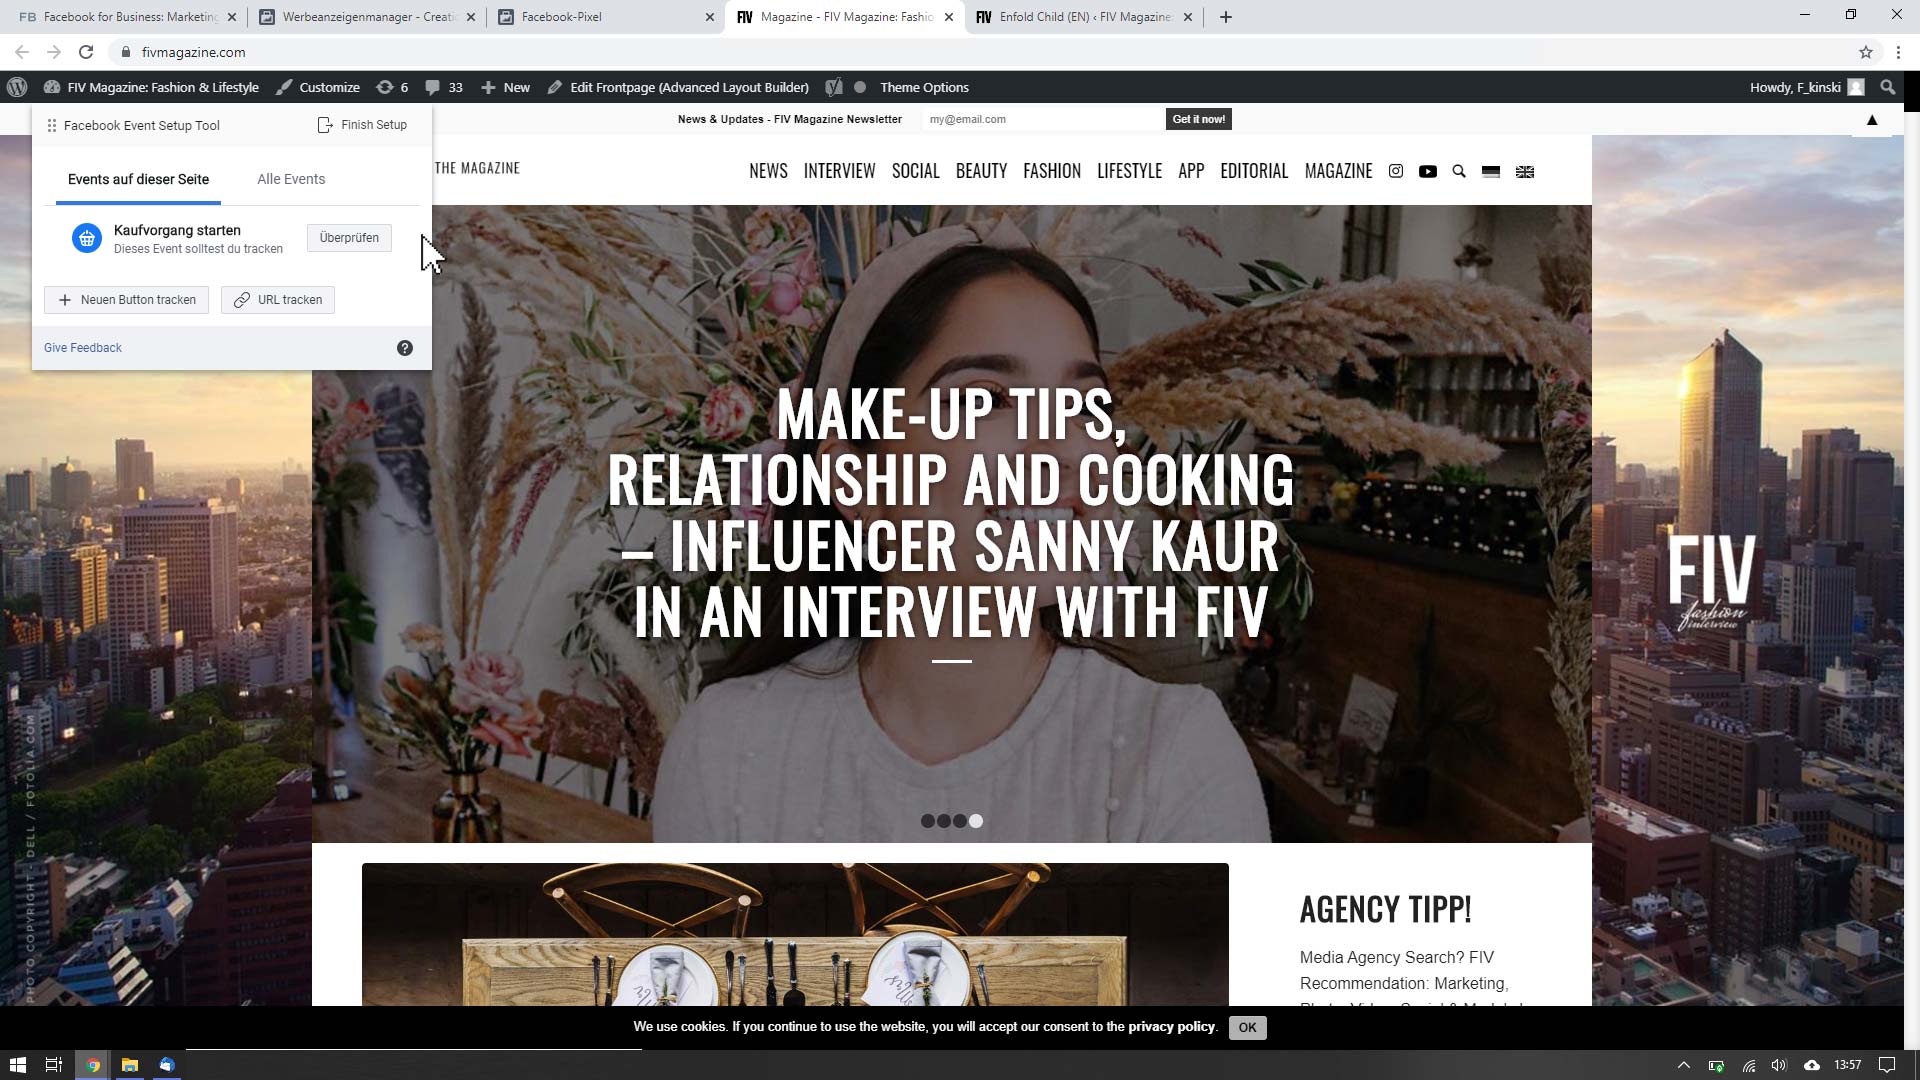
Here in the example you can see that our fashion magazine with the URL https://fivmagazine.com uses a WordPress system. Clicking on “Set up partner” starts the automatic integration of the Facebook pixel into your website.
If you choose the manual setup, you place the code on your website by yourself. This gives you the possibility to personalize events and parameters.
Step 5: Integration (Manual)
Click on “Set up manually”, directly after that you will get your individual code snippet, your Facebook Pixel Code. Now copy and paste the code into your website or online shop.
- Copy the code
- Insert it on your website (after <head> and before </head>) – Tip: With most content management systems you can insert the code directly globally, e.g. in the “Theme Options”.
![]()
Step 6: Automatic data reconciliation
In the next step you can activate the automatic advanced matching.
This is where the information is brought together to link website visitors with people on Facebook. All this with information that your customers have already provided you. This includes, for example, the email address but also the phone number.
This allows you to attribute more conversions to your Facebook ads and reach even more, relevant people through remarketing campaigns.
![]()
Step 7: Pixel Integration Test
Now you come to step 3 of the Pixel installation, test your base code. Connect your desired website and run the test.
![]()
Facebook now sends you to your website (see URL). Now perform your desired conversion (in our example, the contact).
![]()
After you have executed the conversion, your test is confirmed. Your pixel is now tested and active.
![]()
Tip: Embed Facebook Pixel in WordPress Theme
Here you can see how you can embed the Facebook Pixel globally in the theme. Almost all themes for WordPress (like Jupiter, X or here in the example Enfold) have “Theme Options”, here you can embed codes. Not only Facebook, but also Google Analytics or Google Adsense.

Conversion Tracking: Set up events
After your Facebook Pixel is active and your website or online shop is linked to Facebook, you can create your own events. Automatically or manually – start now with your first events.
Create events
Even without HTML knowledge, you can directly use the event setup tool to capture your intended or to be analyzed actions that are important for your business. No further code is required for this.
Alternatively, you can add the event code manually.
Add events automatically with Setup Tool (recommended)
With the automatic add you can make your actions directly in the browser. Facebook registers the interaction and sets up everything independently and automatically. The system is very simple and intuitive. After the manual setup, I’ll show you more about setting up events automatically.
![]()
Add events manually with code and parameters
Adding the code manually is a bit more demanding, you need some basic HTML knowledge. But even without this, you have the principle quickly out.
First, select an event from the list (see screenshot) to add parameters but also to see code. Then copy the individual event tags and paste them in the header area of your website under </head>.
Tip. Select a business category. Facebook will then give you filtered and matching events directly.
SCREEN
Further: Adding events automatically
If you choose to automatically add your interaction, you can easily pretend to do so in your browser. Facebook registers the clicks and the corresponding elements and saves the action as a single event.
- Purchase of a product in the shop
- Storing products in the shopping cart
- Contact via form
- Uvm.
After selecting “add automatically”, you have to enter the URL of the corresponding website. There you perform exactly the interaction you want to track (like the sale of product XY).
![]()
In the next step, your website opens in the new tag, from here you start directly with the interaction that you want to track. In the example, we go to the menu item “Contact” and track the people who contact our project.


By clicking on “Track new button” you can select a page element that will be observed by the pixel.

At the top right of the screen you can directly assign a type of conversion to the specific interaction, here for example appropriately “Contact” from the Standard Events.


Then, the Facebook Pixel in the Ads Manager directly grabs the people (from the entire pool of visitors) who have contacted us.
From this group, you can now create your own target group, for campaigns.
Facebook Analytics
Congratulations! You’ve created and embedded your first custom pixel. You’ve also created your first Facebook Event, which you can now use to create an even more selective audience.
Even better, the pixel records all users on your website from now on. If they are also logged into Facebook (Instagram, Whatsapp, etc.), they are registered and stored. This will soon result in a large treasure trove of data for you with information about your visitors.


Events and Custom Conversion
If you want to add your code manually, you have a lot of freedom. First, however, it is important to track events.
<script>
fbq('track', 'ViewContent');
</script>
Replace the content between <script> and </script>.
<script>
INSERT HERE
</script>
Specifications for Standard Events
Events are individual interactions on your website and in the online shop. With the help of Facebook’s predefined standard events, you can capture conversions (such as sales) and then optimize conversions and build target groups.
You can also find all available codes for Standard Events on Facebook.
For a full list of standard events and the parameters that support them, visit Facebook for Developers.
- Website Action – Standard Event Code
- Add payment info – fbq(‘track’, ‘AddPaymentInfo’);
- Add to Cart – fbq(‘track’, ‘AddToCart’);
- Add to Wishlist – fbq(‘track’, ‘AddToWishlist’);
- Complete Registration – fbq(‘track’, ‘CompleteRegistration’);
- Contact – fbq(‘track’, ‘Contact’);
- Customize Product – fbq(‘track’, ‘CustomizeProduct’);
- Donate – fbq(‘track’, ‘Donate’);
- Find Location – fbq(‘track’, ‘FindLocation’);
- Start checkout process – fbq(‘track’, ‘InitiateCheckout’);
- Lead – fbq(‘track’, ‘Lead’);
- Purchase – fbq(‘track’, ‘Purchase’, {value: 0.00, currency: ‘USD’});
- Schedule an appointment – fbq(‘track’, ‘Schedule’);
- Search – fbq(‘track’, ‘Search’);
- Use trial – fbq(‘track’, ‘StartTrial’, {value: ‘0.00’, currency: ‘USD’, predicted_ltv: ‘0.00’});
- Submit Application – fbq(‘track’, ‘SubmitApplication’);
- Subscribe – fbq(‘track’, ‘Subscribe’, {value: ‘0.00’, currency: ‘USD’, predicted_ltv: ‘0.00’});
- View Content – fbq(‘track’, ‘ViewContent’);
Event and parameters
Let’s look at the shopping cart as an example, your visitor adds one or more products and clicks on the “Shopping Cart” button.
<script>
fbq('track', 'AddToCart');
</script>
You can add the following parameters to get more information (not necessary):
- Content_ids
- Content_name
- Content_type
- Contents
- Currency
- Value
For Dynamic Ads you need the following parameters (required):
- Content_ids
- Content_type
- And contents
Promoted Object Value:
- ADD_TO_CART
Facebook Marketing Plan
The next step is to define your own Facebook marketing plan.
Step 1: Target group and goals
- How old is your target audience?
- What jobs does your target group do?
- What are their daily challenges and needs in everyday life?
- When and how / why do they use Facebook?
Knowing your Facebook demographics will help you realistically assess your potential. You can find two regularly updated sources here.
- Facebook Demographics – Sprout Social
- Facebook Demographics – Omnicore
Important here are, for example, values on age, profession, income, and much more. But first of all, the usage is central: Who uses Facebook? Here are statistical figures from 2018 on the distribution of age groups on Facebook and Instagram:
Facebook: Age and usage
- 51% of 13-17 year olds use Facebook
- 81% of 18-29 year olds use Facebook
- 78% of 30-49 year olds use Facebook
- 65% of 50-64 year olds use Facebook
- 41% of the over 65+ age group use Facebook
With the Facebook Ad Manager, you not only have the option to run Facebook ads, but also Instagram ads can be managed via the tool.
Instagram: Age and usage
- 72% of 13-17 year olds use Instagram
- 64% of 18-29 year olds use Instagram
- 40% of 30-49 year olds use Instagram
- 21% of 50-64 year olds use Instagram
- 10% of over 65+ year olds use Instagram
Next, it’s worth taking a first look at Facebook Audience Insights. This tool gives you access to a lot of interesting information about your target audience. Information such as age, relationship status, gender, education, location and language. The Audience Insights also accesses the purchases already made by the users.
Set goals
Your goals are to generate the most success possible through social media activities. That means not just ‘collecting likes’. It’s about leads, which means interactions like sales and registrations.
A good method to define goals as precisely as possible is the SMART method. As a professional trainer I heard about the method for the first time, but it has also proven itself in social media marketing to create measurable and clear goals.
SMART is made up of 5 elements:
- S for Specific – A goal should be as specific and concrete as possible. Example: “Our community grows to 1,200 fans by Q2, our group grows to 300 members” instead of “community building”.
- M for measurable – Quantitative (i.e. measurable) key figures are important here: A quantity, a timing, or some other measurable criterion. Unfavourable formulations are, for example, “low costs are important”, “more communication” or goals such as “expansion of market share”. These phrases lack a concrete and measurable criterion. Example: “Social media budget limit for Q1 and Q2 must be limited to 20,000 euros” instead of “low costs”.
- A for Accepted – Goals that are considered unacceptable by the customer ultimately have little chance of success. Example: “Bright colors, many effects and large font on the preview images” may meet with skepticism and rejection from the customer, in contrast to “contemporary design of the preview images with activating elements”.
- R for Realistic – Acceptance is often closely linked to feasibility. This means that realistic goals are more easily accepted and motivate customers and teams much more than those that are already seen as unrealistic in advance. Example: “15 Facebook postings (photos) per month, with regular publication” instead of “postings every day on all networks”.
- T for Terminable – The naming of a time is simple but central and essential. Of course, only with terminable goals, such as “Completion of the fan page by March 01″ instead of “Completion of the fan page as soon as possible”.
Content mix
You may have heard of the famous Pareto Principle, the famous 80-to-20 rule. The Pareto principle (also called the Pareto effect or the 80-20 rule) states that 80% of the results are achieved with 20% of the total effort.
It is also used in social media marketing – slightly modified. Here the golden rule is: 80% of your content should inform, entertain, educate and 20% you should use for advertising.
In the content mix, it is always advisable to include third-party content. That means posts, photos and videos from other channels.
Competitor ads
You spy on your competitors’ ads? You can do that? Yes! There is a little trick for that. Here you can see, for example, which changes have been made (e.g. name, cover image) but also – and much more exciting – which ads are currently running!
Why does Facebook show the ads? This is all about transparency. This is how you find the ads of the competition:
- Go to the fan page of the competitor (desktop)
- In the menu you will find “Site Info & Advertising”, here you will find all advertisements
Tip. You see the text “Offers and prices in these ads may not apply to you.” – this is about remarketing. Scroll down and you’ll see the active ads.
Define target groups
There are three different types of target groups:
- Customer audience
- Lookalike audience
- Saved target groups
Saved target groups
Why do you create target groups? For future ads you have to (can) permanently define target groups. With your own, previously saved target groups, you can quickly and easily access your predefined target groups.
Create predefined target group
This is about refining your audiences (Lookalike Audience and Custom Audience [e.g. people who have interacted with your site]) and predefined audiences that you can reuse at any time.
You can create target groups directly during the campaign or in your “Object library” in the upper left corner by clicking on the button “Create target group”, then in the dropdown menu “Saved target group”.
- “Open “Object library
- Click on the button “Create target group” in the upper left corner
- Click on “Saved target group” in the dropdown menu
Once you create your audience, you have the option to refine the Custom Audience or Lookalike Audience.
Example: You take the lookalikes of your customers and refine them through language. This way you reach relevant people with a certain language with an ad.
Accordingly, you can also exclude groups. For example, customers that you do not want to reach a second time with the same offer. Of course, you need to have created a custom audience of people who have already bought the product.
Geo-targeting
We have already reported on geo-targeting more often. If you are planning an event or a trade show appearance soon, you can of course also define the target group by location. Select “People who have recently been to this location” as the location. You then select the corresponding city as the location.
This way you reach people who are on site at the time.
You can even select specific locations or places and go down to 1 kilometer range. Tip. Select “People who live in this location” if you want to reach regional customers for stores. If you already have multiple stores, you can also select and combine multiple locations.
Define target groups
Starting tomorrow!
We also have a separate, large chapter on this in the article.
In short, target group definition is about filtering and excluding characteristics (demographics, interests, or behaviors).
But here you can also exclude people “who like your page”. But you can especially go to new people in the address, “friends of people who like your page”.
A tip in advance, when naming target groups you should proceed in a structured way like: “DE + 18-30 + restaurant specialist | YT video”.
Done! Your target group is created.
Customer audience
Your first customer audience is quickly created. Once your pixel is installed, you can create an ad based on your website traffic.
Example:
- In the first step you select people who have added something to the cart – “AddToCart” event.
- In the second step, specify that, for example, customers who have already purchased are excluded – “Purchase” Event
The highlight: This way you have a customer audience with people who have added a product to their shopping cart but have not purchased it.
Now you can place ads that for example give an extra discount “-30%” or even “free shipping”.
Lookalike audience
What is the Lookalike Audience and how do you create this specific audience? The Lookalike Audience is a powerful tool that allows you to easily reach a larger, more relevant audience.
What is the Lookalike Audience?
The Lookalike Audience is created based on a core target group. For example, the core target group consists of people who have bought something in your online shop. We or Facebook group all of these people together. The next step is to collect commonalities. For example, a large part has the interest “pop music of the 90s” or “Mercedes”. A large part is perhaps between 35-42 years.
The highlight of the Lookalike Audience is a 1% match with the total, German Facebook users.
Your Lookalike Audience consists of 1% of the German Facebook users who are most similar to your core target group. You can now advertise perfectly to these people, as they are more likely to lead to a conversion.
A good core audience is former buyers, users who have signed up for newsletters, etc.
How do I create the customer audience?
How do I create the customer audience? Here’s how:
- Go to your “Ads Manager”
- Go to “Target groups” – if you don’t see “Target groups” directly, go to “All tools”.
- Find a good base audience (ideally a custom audience, like people who have interacted with your Facebook page).
Now we create the lookalike based on existing target audience:
- Select the desired base target group
- Click on the button “Actions” – here you can directly create the Lookalike Audience
- Click on “Lookalike Audience” in the dropdown menu – The Lookalike Audience will be created automatically.
- Still choose the place – for example Germany
- Target group size – Variable from 1-10% of the country
- Set the “number of target groups” high, so lookalikes with different % values are created.
Experiment and see what works best for you and your goals. How do you refine the Lookalike Audience? Segment even more by data like age, so your group becomes even smaller.
Define target groups
Starting tomorrow!
In short, target group definition is about filtering and excluding characteristics. These are:
- Demographics
- Interests
- Behavior
Remarketing
The nuts and bolts of remarketing are your customer audiences.
- Facebook Pixel must be installed
- Pay attention to data protection with remarketing campaigns on Facebook
- Switch to “Target groups
- “Create Target Audience”
- Pop Up Opens “Create a Custom Audience” and Save
Now you can “create an ad”. When you do that, you’ll go back to the Ads Manager.
- Select target (e.g. conversion)
- Custom Audience is automatically implemented
- Now you can further segment, for example, by gender. Address possible like: “You have visited us, now -50% for women!”. But also interests (also parents who have become), etc. are possible.
Tip. You should also create a customer audience with users who have already made a conversion. This group will then be excluded, e.g. “People who have already bought” (name of the customer audience).
As I said, the nuts and bolts of remarketing are your customer audiences.
Create a Customer Audience with 30 days, one with 60 days. Then create an ad for the users who were on your site 60 days ago and exclude the ones who were on your site in the last 30 days. Experiment and play around.
Retargeting Ad Strategy
Again as a reminder, when we talk about retargeting, we’re talking about:
- Your website visitors
- Your email or customer list
- Anyone who interacts with your Facebook Page / content
Infographic: Retargeting
This is what an exemplary campaign looks like. At all points, we bring back people who have dropped out along the way for a variety of reasons.
Infographic: Facebook Strategy 2020 – Example Customer Journey
Your goal is clear: Every time someone opens the Facebook newsfeed, your content is visible. That’s how you build awareness.
Example: For gyms, it takes motivation. Those who watch a video on Facebook (over 50%) and have not yet signed up or registered, you send them a daily reminder in the form of ads.
Infographic: Facebook Strategy 2020 – Favorable with Retargeting Audience
Interaction on your own website
Facebook comments make homepages, blogs and online shops much more lively. Users are no longer forced to enter their data or register. By placing or exchanging the WordPress comments with the Facebook code, the interaction, the user retention and also the visit times of your website, blog or shop increases. For the embedding there are of course WordPress plugins. With a little copy & paste you can also do everything yourself. Today not with video tutorial, but quite classic with screenshots, because it is really fast, even without advertising agency.
- Continue reading Facebook Comments for WordPress – App creation, code integration and moderation here.
Questions and answers
As a Facebook agency, many questions reach us weekly! From very simple ones like “What is a Facebook Ad?” to “How much does an ad cost on Facebook?” Here we have the most important answers to the most important questions of our community.
Soon we will answer more specific questions here!
- How many customer audiences make sense?
- Which customer audiences are standard?
- How complex should a campaign be / overall. Better few, good ads or many tests
What is a Facebook Ad?
Facebook Ads are advertisements that are played within Facebook and its subsidiaries like Instagram and Whatsapp.
How can I turn off advertising on Facebook?
You can place ads on Facebook using the Ads Manager.
How much does advertising on Facebook and Instagram cost?
On social networks, you always pay for reach. This means that the more people see your post, the more expensive it will be. The more specific your target group is, the less wastage you have. That’s why it’s so important to constantly optimize your ads.
In particular, the Facebook Pixel helps improve ads to minimize costs.
How do I block ads on my phone?
You can’t block ads within the Facebook app. However, you can use adblockers for the browser on your PC.
How do I delete my Facebook account from my mobile phone?
For those who are tired of Facebook, the question is, how do I get rid of Facebook? This is how you delete your account permanently:
- Click on the menu in the upper right corner (works from any Facebook page)
- Click on settings and then in the left column on “Information”.
- Click on “Deactivation and deletion”.
- Select “Delete account” and then click “Continue and delete account”.
After that you have to wait 14 days until your account is finally deleted. During this time you can reactivate it when you log in. If you do not log in for more than 14 days, your account will be permanently deleted.
For more information on deactivating and deleting your Facebook account, visit Facebook.
Tip. Our Facebook agency
New! Native Ads: Referral Marketing
Native ads (also called native display ads) refer to all paid advertising formats that are discreetly labeled as ads. So, simply put, native advertising is advertising that doesn’t look like advertising. Native Ads offer small disadvantages, but mostly advantages. Did you know. According to a whitepaper by AppNexus, the CTR of native display ads is 8.8 times higher on average. According to Forbes, Native Ads increase purchase intent by a whopping 18%. We also always measure a higher CTR in our client projects. What does this have to do with? Personalization of content, storytelling and more discreet communication channels: referral marketing. Why Native Advertising? What is native advertising? What is native advertising?


Increasing Reach: The Most Important Leverage Points for Each Channel
History of Marketing: From Early Advertising to Modern Campaigns

Marketing Language: How Brands Speak, Persuade, and Trigger Reactions

Influencers in Marketing: How Brands Use Influencers to Expand Their Reach
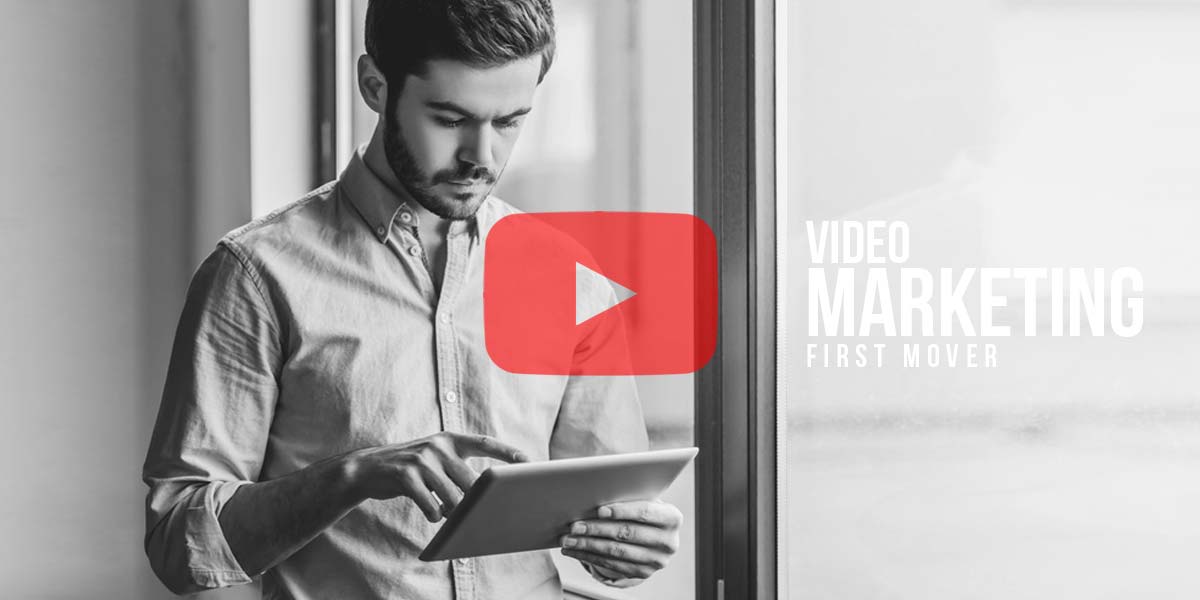
YouTube Streaming in Marketing: Live Events, Product Launches, and Community Building
Live Commentary in Marketing: Real-Time Community Engagement


 4.9 / 5.0