Facebook Fanpage Design Template: Free Tutorial
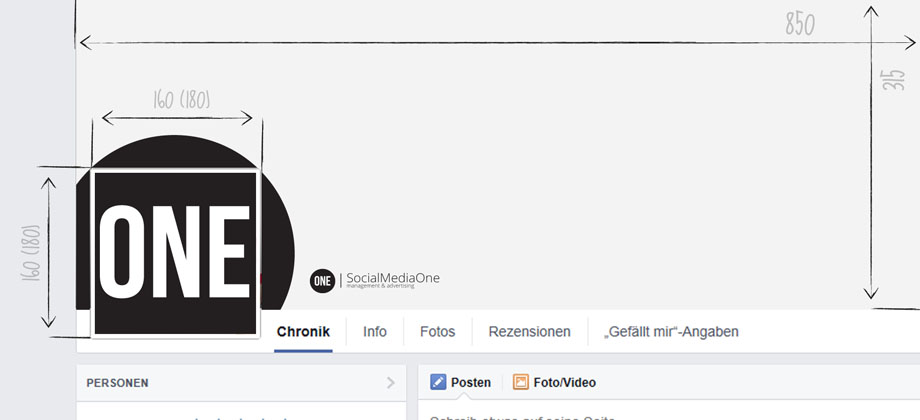
Facebook changes its style every year. Although the dimensions for the own Facebook title image (850 x 315 pixels) and profile image (180 x 180 pixels) remained, the layout has shifted a bit. If you want to bring design elements (such as color traces) into your fanpage design, you have to consider the new positioning of title and profile pictures. In our small example tutorial, it is easy to see how the hand does not pass cleanly from profile to title. It is a little bit moved to the left. The change is minimal. The profile is slightly further to the left than before (see screenshot). To save you time I created a Photoshop design template in the university. Here you can easily insert existing graphics and save 1: 1. A small tutorial and the download you will find in the further post.
Facebook Fanpage Design in 4 steps:
Step 1: Facebook graphic layout in Photoshop
The PSD is created twice as large as needed. Why? Thus, you definitely get no problems with the profile image, the dimension of which is larger than the pixels actually displayed. Insert the graphics into the provided folders (title, profile). Tip! As marked in the template as “EXAMPLE”, the background layers of the profile and title image. This keeps the transition clean and you can move the background freely and easily.
Step 2: Disable preview level
To save Facebook profile and title images, first disable the top level “profile image – shape”.
Step 3: Select and release masks
Select the masks of the two folders (title, profile). Very easy with ALT + mouse click (on the mask). Switch back to the normal view and free the picture (Edit> Release). So you have the original dimensions. As a reminder, title must be (minimum) 850 x 315 pixels and the profile image (min.) 180 x 180 pixels, but the display is limited to 160 x 160 pixels.
Step 4: Save and upload
Save your picture as .jpg with quality level 10, 11. In the following you can upload your new profile and title picture to the Facebook fanpage.

Facebook Ads Agency: Place ads

Facebook Ads 2.0: Ads for Affiliate and Coaching - Online Course

Cashflow Ads 2.0: Facebook Ads step by step - Online Course

Facebook Ad Traffic: 10x more reach - Online Course
Live Stories - Video Marketing on Facebook, Snapchat and Instagram

Crisis Management - Positive Model and Tips for Social Media Crises


 4.9 / 5.0